WEEK 1–WEEK 5 : THE EXERCISE
28 March 2017 - 25 April 2017 (Week 1- Week 5)
Aurelia Regina Sutjahjokartiko, (0329953)
Typography and Hypertextuality
Exercises
Lecture 1
28 March 2017 (week 1)
Introduce Typography
We were given briefing about module outline, introduce types of assignment and little introduction about typography such as Western Calligraphy. After that, my group work should select one kind of Western Calligraphy and we chose Copperplate Calligraphy.
1. Western calligraphy is the art of writing and penmanship as practiced in the Western world, especially using the Latin alphabet (but also including calligraphic use of the Cyrillic and Greek alphabets, as opposed to "Eastern" traditions such as Perso-Arabic, Chinese or Indian calligraphy).
2. Copperplate Calligraphy
Lecture 2
4 April 2017 (Week 2)
What is Typography?
We were given introduce about Typography self, Typography Structure, who can practices Typography and introduce a few famous names who contribute Typography.
1. What is Typography
Typography is the work of typesetters (also known as compositors), typographers, graphic designers, art directors, manga artists, comic book artists, graffiti artists, and, now, anyone who arranges words, letters, numbers, and symbols for publication, display, or distribution, from clerical workers and newsletter writers to anyone self-publishing materials. Until the Digital Age, typography was a specialized occupation. Digitization opened up typography to new generations of previously unrelated designers and lay users, and David Jury, head of graphic design at Colchester Institute in England, states that "typography is now something everybody does." - Wikipedia.com
3. Terminology
1. Paul Rand

Born: August 15, 1914, Brooklyn, New York City, New York, United States
Died: November 26, 1996, Norwalk, Connecticut, United States
Nationality: American
Education: Art Students League of New York, Parsons School of Design, Pratt Institute
Parents: Itzhak Yehuda Rosenbaum, Leah Rosenbaum
2. Sheigo Fukuda

Born: February 4, 1932, Tokyo, Japan
Died: January 11, 2009, Mitaka, Tokyo, Japan
Education: Tokyo University of the Arts
Books: Shigeo Fukuda - 150 posters
3. Reza Abedini

Born: 1967, Tehran, Iran
Education: Tehran University of Art
Books: Vision of Design: Reza Abedini, Seeing Studies
4. Allen Fletcher

Born: September 27, 1931, Nairobi, Kenya
Died: September 21, 2006, London, United Kingdom
Spouse: Paola Biagi (m. 1956–2006)
Education: Yale University, Central Saint Martins, Royal College of Art
Organization founded: Pentagram
5. Wolfgang Weingart

Born: 1941, Germany
Books: Typography
Lecture 3
11 April 2017(Week 3)
Typography Anatomy
We were given introduce about basic typography anatomy such as describing letter forms, the font, describing typeface, and comparing typefaces.


There is 10 typeface of 500 typefaces used for basic typography. As a beginner typographer, this 10 typefaces are important to learn. Once understand how to use these faces appropriately and effectively, it will be well prepared to understand and appreciate other typefaces as you encounter them.

18 April 2017(Week 4)
History of Typography - Type Expression
We were given introduce about history of Typography from the beginning to the modern era and some practical to express something into typography as we called Type Expression.

1. From Phoenician To Roman


In the third century BC, the letter G (a variant of C) was added; Z was borrowed from the Greek, then dropped as Latin had no need for it — perhaps at the behest of the Roman censor Appius Claudius; G took its place in the line-up, until the first century BC, when the Romans decided they needed the Z for borrowed Greek words (when Greek literature became the vogue), they re-introduced it, and placed it at the end of the alphabet, where it remains to this day.

A beautiful, legible book hand; long ascenders and descenders, letting in light between the lines, open and round letters with few ligatures and variant letterforms. The early Carolingian scripts share some features with the Roman Half-Uncial (the club shape ‘head serifs’ on the ascenders of b, d, h, and l, by the 11th century these were replaced by triangular serifs, similar to those we see in numerous roman typefaces of the incunabula (latter half of the 15th century). The early, rounder a was dropped in favor of one similar to that found in early Roman Uncials. In manuscripts penned in this hand, it is not uncommon to see the r with a descender.
With Charlemagne and the Church behind it, the Carolingian script quickly spread across Europe, deposing a multitude of regional scripts on its way. By the second half of the tenth century, Carolingian script had reached England, replacing late forms of the Insular script; in Spain it replaced Visigothic.
That the open forms of the Carolingian script were replaced, from the 12th century, by the darker, more condensed, angular, ligature-ridden, closed forms of the Gothic scripts is, as Delorez writes, one of the mysteries of history.
We stand in the seventeenth century, some 5,000 years after the Sumerians set stylus to clay. We now have a dual alphabet of 26 letters, uppercase and lowercase forms. There is hardly a straight line to be seen in the history of the alphabet. No Darwinian progress there, no survival of the fittest. Many of the aforementioned scripts developed side-by-side, some disappeared and reappeared, some can be shown to be the product of the mind of one man like Alcuin of York. And we do not know what would have happened if Hannibal had marched straight to Rome after winning the battle of Cannae instead of loitering.

The Blackletter typeface (also sometimes referred to as Gothic, Fraktur or Old English) was used in the Guthenburg Bible, one of the first books printed in Europe. This style of typeface is recognizable by its dramatic thin and thick strokes, and in some fonts, the elaborate swirls on the serifs. Blackletter typefaces are based on early manuscript lettering.
They evolved in Western Europe from the mid twelfth century. Over time a wide variety of different blackletters appeared, but four major families can be identified: Textura, Rotunda, Schwabacher and Fraktur. It’s beyond the scope of this article to go into each one, but if you look at the letter “o” in the chart above you will see the difference.
While Gutenberg used blackletters for his bible and books, this signaled a new era in typefaces used for printing. Blackletters are difficult to read as body text and Roman and Italic faces were easier to print with movable type. For these reasons, in the 1500’s, blackletter became less popular for printing in many countries except Germany and the German speaking countries.

Lecture 5
25 April 2017 (Week 5)
Letters Elements
We were given short theory about letterform, x-height, form-counterform, contrast, and principle of typography. At the end of class, our lectures asked us to fix our blog. Therefore, there is not exercise for this module (next exercise in project 1).
1. Principle of Typography


2. Contrast is good, but the wrong colors can be painful
The most common form text in is black over white background. Despite the fact that people love colors, sometimes color makes text harder to read, less enjoyable and can ever cause pain when looked at for a longer time. It is almost always a bad idea to choose a text color and a background color which contrast with one another in a discordant manner.

3. Limited use of display faces
Display typefaces are fun and they look very interesting. No matter how much you like them, don’t use them excessively. Keep in mind that ornamental and display typefaces were not designed to be used for bodies of text as they generally require a larger font to be readable. A good thing to remember is that these faces tend to be more complex, thus tiring the viewer’s eyes easily.
4. Scannable text is must
When writing for the web, readability is not the only thing you have to worry about. The user is free to surf away at any moment and with just one click. Your purpose is to make sure that the text is in such good shape that the reader will keep his interest long enough to read through the whole thing. That won’t happen unless he can easily scan it for focus points that peak his interest.
Focus points are elements that will draw the user’s attention, such as a header, a button, a graphical element, emphasized text.
The main things that impact how scannable your text is are focus points, header size and position, text size, line height, alignment and contrast. Good use of these elements will make sure your reader will be made aware of the content of your copy before choosing to read it wholly or abandon it.
5. Don't Distort typefaces
Each typeface contains styles and weights that are already properly expanded and condensed. Type designers know that people want “thinner” or “thicker” fonts, so sometimes these styles are included in typeface families.

2. Form and Counterform
Counterform is the blank spaces between individual letters and as designers this can be used to great effect, also referred to as ‘negative space’. By definition, a word has the potential to express an idea, object, or event. Word signs are independent of the things they represent, yet by design they can be made to signify and reveal their meaning. Such as below. the word ‘Joy’ which is made up of three characters that don’t have any relation to the meaning of the word itself, however in this example they are transformed through using the letters shape and form into a clever way to express the meaning of the word.

“The material of typography is the black, and it is the designer’s task with the help of this black to capture space, to create harmonious whites inside the letters as well as between them.”
(https://brucewilsongraphics.wordpress.com/2012/10/17/counter-form/)
3. Contrast
As you have probably know, most online readers don’t read line by line, instead they scan (from one point to another). For this reason, designers create typographic contrast and flow by emphasizing certain text. Contrast is important because not all the content within a page have the same value, some have greater significance than the others. By creating contrast, you can direct the reader’s attention to the important messages and at the same time enhance the visual appearance. Here are seven basic methods on how you can create typographic contrast.


Instruction
Exercises (20%)
The Brief
Exercises.
Duration of Assignment
4 Weeks (Briefing on Week 1)
DEADLINE
Week 5 (24 Apr 2017)
Description
Throughout the beginning and the middle of the semester, exercises will be prescribed at various
phases of the module. These exercises will aid and benefit you in your quest to gain theoretical
and practical knowledge in Typography that will inform you and provide you with the necessary
experience to take on the module’s projects.
All exercises prescribed are to be completed and documented (labelled, clean, clear & concise) in
your ePortfolio and Hardcopy portfolio respectively.
The exercises are as follows:
1) Calligraphy
2) Lettering
3) Type Expression
Calligraphy: You will choose a calligraphic hand (Round Hand, Black Letter, Uncial). You will
complete the prescribed exercises (vertical lines, horizontal lines, circular lines and letters a–z).
Upon completion of the prescribed exercises, you shall write a small 3 or 4 line passage/poem.
You have 2 weeks for this exercise; it is to be done in class and at home. (2 weeks).
Lettering: Draw out the letters of your name (first name or nick-name). Try to capture your
personality or character in the design of the letters. Using the appropriate software, animate the
drawn out letters while ensuring the animated gif stays withing the character and personality. (1
week).
Type Expression: You will be given 6 words to compose and express. You will be given a set of
typefaces to work with. Through iteration, use the appropriate typeface and compose the letters in
a manner that allows meaning of the word to become visible. (1 week).
Requirements
To complete and to showcase mastery in the exercises prescribed in its various forms over the
13-week period. This process is repeated for all 8 weeks. The work is compiled logically and
chronologically in an A3 clear sheet folder and documented on the students’ eportfolio.
Submission
1. Exercises to be documented in an A4 Clear Sheet folder, logically and chronologically.
The works must be labelled and dated.
2. Eportfolio posts at the end of the assessment task labelled and dated, with images
captured well and in good light in so that the works are pleasing to the eye and legible.
Objectives
1. An appreciation and understanding for the evolution of Typography.
2. An appreciation of the skills sets and mental discipline required in Typography
3. To develop the necessary technical skills and sensibilities for typographic communication.
Exercise
Exercise 1 (28 March 2017) - Basic Calligraphy
Material and tools :1. Graph Paper (A4 size, 2mm square 20cm x 80 cm)
2. Calligraphy pen 2.0 ( Flat nib and diagonal nib)
Step by step :
1. First, prepare three graph papers and two calligraphy pen which are one flat nib and one diagonal nib
2. Next, make vertical line with the flat nib calligraphy pen on the graph paper
3. The second graph paper, make horizontal line with the diagonal nib calligraphy pen
4. The third graph paper, make circular line with the same nib as horizontal line before


Material and tools :
1. Graph Paper (A4 size, 2mm square 20cm x 80 cm)
2. Calligraphy pen 3.0 (flat nib)
3. A4 Clear Paper (landscape position)
Step by step :
1. First, prepare three graph papers, A4 Paper, and one 3.0 calligraphy pen
2. Next, make write alphabet from A to Z which are lowercase. (Example : from A to H on graph paper and continue in other graph papers)
3. Choose quote which fit 3 lines 4 words in one line.
4. Write down your quote in the middle on A4 paper with landscape position and use 3.0 calligraphy pen flat nib.


 Exercise 3 (11 April 2017) - Lettering
Material and Tool :
1. Graph Paper (A4 size, 2mm square 20cm x 80 cm) or any paper that you prefer
2. Pen (you can use any pen that suitable for you)
3. Adobe Illustrator and Adobe Photoshop
Step by step :
1. Draw your name with graffiti or same as that with out any typography concept
2. Use pen tool in Adobe Illustrator to trace your drawing, color it and save it as PNG
3. Open Adobe Illustrator again
4. Open new documents with 72 dpi, arranged by row ( → ), and use 9 art boards (or you use more than 9, it depends on what you need)
5. Make your GIF as a chronology (example : disappear - appear - disappear) with that artboars
6. Export as PNG and tick "artboard"
7. Open Adobe Photoshop
8. Click File > New
9. Width : 297 , Height : 210 , Resolution 72 pixel/inch and click Ok
10. Click File > Script > Load File into stack > select entire file that you make in Adobe Illustrator
11. Click Windows > Timeline > Create frame animation
12. Add frame as many as you create in Adobe Illustrator and set up all 0.2 second
13. Click first frame > turn off all layer > turn on 1st layer> click 2nd frame > turn of 1st layer > turn on 2nd layer> click 3rd frame > etc.
14. Change "once" into "forever"
15. Export > Save for Web > set up "GIF" > Done
16. You can open your GIF in web.

Material and tools :
1. Graph Paper or Drawing book
2. Pen ( you can use any pen that suitable for you)
3. Adobe Illustrator and Adobe Photoshop
Step by step:
1. Sketch "Kick", "jump", "Throw", "Hunt", "Sleep", and "Fart" with only that words
2. Next, put that are words into Adobe Illustrator and use propitiate font to describe that words. (Weight : 297 mm, Height : 210 mm)
3. Pick one words that possible to make animated GIF ( i choose "Sleep")
4. Make that words into animated GIF

Feedback
Week 1
We did research about Western Calligraphy and my group chose "copperlate calligraphy". It is quite good our group perfomance, because we explain about history, then explain what documents that should use this font, and then we gave picture about that fonts.
Week 2
Overall is good. But there are some straight line (horizontal and vertical) and circular line which are inconsistent. Thus, if you (Regina) did some line with not really neat, please leave it and move on to the next line. Therefore, the wrong line that you made will be more "ugly" if you force to stack it.
Week 3
Overall good. The lecture suggest me to practice once again, because based on what i did on the graph paper and A4 paper are good start practice as the beginner. Therefore, i should do with neat. For example, i did quote on sketch book, and for my lecture, this is not pleasing to the eye.
Week 4
There was misunderstood, because Mr Vinod said that "make it better" and i did with full color. So, when he saw my animated GIF, he said that should be no color. And of course, explain why you choose this design. But, i cant explain why because there is deep meaning that i cant explain in sentences.
Week 5
Overall is good, just need make better because too many spacing and bold text. Then, for GIF, a verb that i used is "sleep", but Mr Shamsul read that as "sleed". (So, i remake that GIF to make it better)
Reflection
Experience
I never expected this kind of assignment. Because i don't have any design background and this is my first time to feel how to a be designer life. When a lecture asked us to do this assignment, i felt excited. Therefore, i did all assignment only for four days ( one day with fail result ). I hope with this knowledge, experience, and assignment in the future will lead me to be a great designer
Observation
I noticed that i am kind of person who do everything with mood. For example, if i like the assignment or feel excited with that, i will do that with my best and happy mood. But, if i feel lazy mood or bad mood, i will not do assignment until one day before deadline. And i realized that mood will interrupt my process of work. And another factor, i am kind person who do everything in night, because in the afternoon, i feels like wants to sleep and in the night is my productive atmosphere. Henceforth, i will attempt to do assignment after my lecture ask me and will not do that on one day before deadline. Because i realized a deadline will come everyday without notice are you done with the previous assignment.or not
Findings
Sometimes i found i can do with good time management with good mood. But, in the bad mood or lazy mood, i will do everything randomly and messy and of course it make me hard to do it. Therefore, i need build my mood into good mood with listening music while i do my homework. Hence, listening music which is non-slow music build my mood and i can find new inspiration.
Reference
Typographic Design : Form and Communication (4th Edition)

Aurelia Regina Sutjahjokartiko, (0329953)
Typography and Hypertextuality
Exercises
Lecture 1
28 March 2017 (week 1)
Introduce Typography
 |
| Figure 1. Calligraphy Exercise |
1. Western calligraphy is the art of writing and penmanship as practiced in the Western world, especially using the Latin alphabet (but also including calligraphic use of the Cyrillic and Greek alphabets, as opposed to "Eastern" traditions such as Perso-Arabic, Chinese or Indian calligraphy).
2. Copperplate Calligraphy
- Copperplate is a style of calligraphic writing that uses a pointed steel nib or quill to produce a style of lettering characterized by both thick and thin strokes. Copperplate most accurately refers to a wide variety of styles produced after studying the copper plate engravings used to print and redistribute the artwork of English round hand writing masters as far back as the 16th century.
- Copperplate styles of script include roundhand, Engraver's and Engrosser’s scripts. Roundhand or more specifically English roundhand script is a form of quill pen based handwriting that flourished in England several centuries ago.
- The Copperplate style originates from Europe in the early seventeenth century. By the beginning of the eighteenth century, many craftsman considered themselves masters in writing. To encourage people to follow in their footsteps (and increase business) they decided to make their penmanship more accessible for people to learn. So they began to produce books so people could practice.
- Copperplate scripts are written at a letter slant of 55 degrees, and emphasize the broader downstrokes, much like modern cursive, giving the script a fluid, delicate yet grounded appearance. Capital letters feature the S-shaped “line of beauty,” which was very popular in the 1700s for furniture and architectural design, as well as cursive.
Lecture 2
4 April 2017 (Week 2)
What is Typography?
We were given introduce about Typography self, Typography Structure, who can practices Typography and introduce a few famous names who contribute Typography.
1. What is Typography
- Typography is the art and technique of arranging type to make written language legible, readable, and appealing when displayed. The arrangement of type involves selecting typefaces, point sizes, line lengths, line-spacing (leading), and letter-spacing (tracking), and adjusting the space between pairs of letters (kerning) - Wikipedia.com
- The style and appearance of printed matter. - oxforddictionaries.com
- The art or procedure of arranging type or processing data and printing from it. -oxforddictionaries.com
Typography is the work of typesetters (also known as compositors), typographers, graphic designers, art directors, manga artists, comic book artists, graffiti artists, and, now, anyone who arranges words, letters, numbers, and symbols for publication, display, or distribution, from clerical workers and newsletter writers to anyone self-publishing materials. Until the Digital Age, typography was a specialized occupation. Digitization opened up typography to new generations of previously unrelated designers and lay users, and David Jury, head of graphic design at Colchester Institute in England, states that "typography is now something everybody does." - Wikipedia.com
3. Terminology
- Font : a font refers to the individual font or weight within the typeface, i.e. Georgia Reguler, Georgia Italic and Georgia Bold.
- Typeface : a typeface refers to the entire family of fonts that share similiar characteristic, i.e Georgia, Arial, Times New Roman, Didot and Futura
- Type family : a type family refers to the many wieights within and individual typeface.
1. Paul Rand

Figure 2. Paul Rand (source : google.com)
Paul Rand was an American art director and graphic designer, best known for his corporate logo designs, including the logos for IBM, UPS, Enron, Morningstar, Inc., Westinghouse, ABC, and NeXT. Born: August 15, 1914, Brooklyn, New York City, New York, United States
Died: November 26, 1996, Norwalk, Connecticut, United States
Nationality: American
Education: Art Students League of New York, Parsons School of Design, Pratt Institute
Parents: Itzhak Yehuda Rosenbaum, Leah Rosenbaum
2. Sheigo Fukuda

Figure 3. Sheigo Fukuda (source : google.com)
Shigeo Fukuda was a sculptor, graphic artist and poster designer who created optical illusions. His art pieces usually portray deception, such as Lunch With a Helmet On, a sculpture created entirely . Born: February 4, 1932, Tokyo, Japan
Died: January 11, 2009, Mitaka, Tokyo, Japan
Education: Tokyo University of the Arts
Books: Shigeo Fukuda - 150 posters
3. Reza Abedini

Figure 4. Reza Abedini (source : google.com)
Reza Abedini, is an Iranian graphic designer and a professor of graphic design and visual culture at the American University of Beirut. Abedini is one of the most famous graphic designers in Iran because of his modern Persian typography. Born: 1967, Tehran, Iran
Education: Tehran University of Art
Books: Vision of Design: Reza Abedini, Seeing Studies
4. Allen Fletcher

Figure 5. Allen Fletcher (source : google.com)
Alan Gerard Fletcher was a British graphic designer. In his obituary, he was described by The Daily Telegraph as "the most highly regarded graphic designer of his generation, and probably one of the most prolific". Born: September 27, 1931, Nairobi, Kenya
Died: September 21, 2006, London, United Kingdom
Spouse: Paola Biagi (m. 1956–2006)
Education: Yale University, Central Saint Martins, Royal College of Art
Organization founded: Pentagram
5. Wolfgang Weingart

Figure 6. Wolfgang Weingart (source : google.com)
Wolfgang Weingart is an internationally known graphic designer and typographer. His work is categorized as Swiss typography and he is credited as "the father" of New Wave or Swiss Punk typography. Wikipedia Born: 1941, Germany
Books: Typography
Lecture 3
11 April 2017(Week 3)
Typography Anatomy
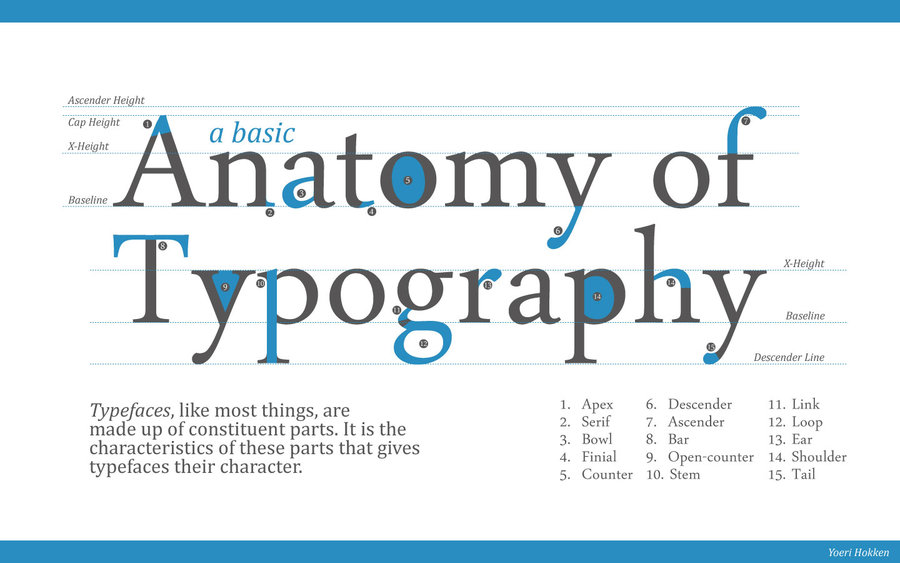
We were given introduce about basic typography anatomy such as describing letter forms, the font, describing typeface, and comparing typefaces.
Figure 7. a basic Anatomy of Typography (source : google.com)
1. Describing Letter form
Figure 8. Line Anatomy
- Baseline : The imaginary line the visual base of the letterforms.
- Median : The imaginary line defining the x-height of letterforms.
- X-height : The height in any typeface of the lowercase ‘x’.
- Apex : The point created by joining two diagonal stems (apex above and vertex below)
- Serif : The right-angled or oblique foot at the end of the stroke.
- Bowl : The rounded form that describes a counter. The bowl may be either open or closed.
- Finial : The rounded non-serif terminal to a stroke.
- Descender : The portion of the stem of a lowercase letterform that projects below the baseline.
- Ascender : The portion of the stem of a lowercase letterform that projects above the median.
- Link : The stroke that connects the bowl and the loop of a lowercase G.
- Loop : In some typefaces, the bowl created in the descender of the lowercase G.
- Ear : The stroke extending out from the main stem or body of the letterform.
- Shoulder : The curved stroke that is not part of a bowl.
- Tail : The curved diagonal stroke at the finish of certain letterforms.
- Stem : The significant vertical or oblique stroke.
- Stroke : Any line that defines the basic letterform
- Uppercase : Capital letters, including certain accented vowels, the c cedilla and n tilde, and the a/e and o/e ligatures.
- Lowercase : Lowercase letters include the same characters as uppercase
 Figure 9. Lowercase
- Small Capital : Small Capitals Uppercase letterforms draw to the x-height of the typeface. Small Caps are primarily found in serif fonts as part of what is often called expert set.
 Figure 10. Small Capital

- Uppercase Numerals : Also called lining figures, these numerals are the same height as uppercase letters and are all set to the same kerning width. They are most successfully used with tabular material or in any situation that calls for uppercase letters.
- Lowercase Numerals : Also known as old style figures or text figures, these numerals are set to x-height with ascenders and descenders. They are best used when ever you would use upper and lowercase letterforms. Lowercase numerals are far less common in sans serif type-faces than in serif.

Figure 11. Lowercase Numerals
- Italic : Most fonts today are produced with a matching italic. Small caps, however, are almost always only roman. The forms in a italic refer back to fifteenth century Italian cursive handwriting. Oblique are typically based on the roman form of the typeface.
- Punctuation and miscellaneous characters : Although all fonts contain standard punctuation marks, miscellaneous characters can change from typeface to typeface. It’s important to be acquainted with all the characters available in a typeface before you choose the appropriate type for a particular job.

Figure 12. Punctuation and miscellaneous characters
- Ornaments : Used as flourishes in invitations or certificates. They usually are provided as a font in a larger typeface family. Only a few traditional or classical typefaces contain ornamental fonts as part of the entire typeface family (Adobe Caslon Pro).
- Roman : The letterform is so called because the uppercase forms are derived from inscriptions of Roman monuments. A slightly lighter stroke in roman is known as ‘Book’.
- Italic : Named for fifteenth century Italian handwriting on which the forms are based
- Oblique : conversely are based on roman form of typeface
- Condense : A version of the roman form, and extremely condense styles are often called ‘compressed
- Extended : An extended variation of a roman font.

Figure 13. Typefaces
4. Comparing Typeface There is 10 typeface of 500 typefaces used for basic typography. As a beginner typographer, this 10 typefaces are important to learn. Once understand how to use these faces appropriately and effectively, it will be well prepared to understand and appreciate other typefaces as you encounter them.
Figure 14. Typefaces
Lecture 4 18 April 2017(Week 4)
History of Typography - Type Expression
We were given introduce about history of Typography from the beginning to the modern era and some practical to express something into typography as we called Type Expression.
Figure 15.The Evolution of Typography (source : google.com)
The first timeline predates typography, It begins with the invention of writing over five thousand years ago and ends with the invention of moveable type in Europe during the middle of the fifteenth century. The second timeline covers the long era of the handpress and the handset metal types. This period, from Gutenberg's invention of moveable type to the end of eighteen century, lasted about three hundred and fifty years. In the third timeline, the Industrial evolution and nineteenth century are revealed as an era of technological innovation and an outporing of new typographic forms. The fourth timeline begins with the year 1900 and cover twentieth century, when type was shaped by the aesthetic concern of modernism, the need for functional communication and technological progress. 1. From Phoenician To Roman
- The Phoenician
- The Greek
Figure 16. The Boustrophedon (source : google.com)
Although the earliest extant Greek inscriptions date back to the 8th century BC — the first Olympic games were held in 776 BC — many scholars think that the Greeks adopted the West Semitic Script (the Phoenician consonant alphabet) three centuries earlier. (note: Naveh, Millard, McCarter, and Cross concur. See Naveh, pp. 185-6). For a long time (at least until the widespread adoption of Ionian script in the fourth century BC), the Greek scripts followed no fixed direction, being written left to right, right to left, and in horizontal boustrophedon. (Braille is set boustrophedonically.). In Greek scripts we witness the jettisoning of pictographic forms in favor of abstract, linear forms. Based on comparisons of late Phoenician alphabets and archaic Greek scripts (and Greek tradition; e.g. Herodotus) it appears that the Greeks simply adopted most of the Phoenician signs but added the vowels that the Phoenicians had left out. - The Etruscan
Figure 17. The Etruscan (source : google.com)
The Etruscans came to Italy from western Asia Minor (modern-day Turkey). From about 750 BC, the Greeks, as far north as Naples, were settling in Italy. Finley writes about their passionate addiction to everything Greek — except for the Greek’s gloomy take on the afterlife and its dreadful underworld. They were among the first imitators of Greek vases which they often decorated with phoney Greek inscriptions. However, their alphabet survived and prospered as it spread over the world with the expansion of the world’s mistress, the mighty Roman Empire. - Latin
In the third century BC, the letter G (a variant of C) was added; Z was borrowed from the Greek, then dropped as Latin had no need for it — perhaps at the behest of the Roman censor Appius Claudius; G took its place in the line-up, until the first century BC, when the Romans decided they needed the Z for borrowed Greek words (when Greek literature became the vogue), they re-introduced it, and placed it at the end of the alphabet, where it remains to this day.
- Rustic Capital
- Uncial and Half Uncial
Figure 18. Uncial and Half Uncial (source : google.com)
Most writing was of course done on papyrus and on walls, informal and quick. The cursive was the letter that Martialis read aloud to his friends when he recited his poems at night. This was a letterform that could be jotted down quickly with a reed pen dipped in ink. The ‘old’ cursive is difficult to read but the ‘new’, that evolved from the 4th century onwards resembles our own writing. It spawned the much later Carolingian minuscule letter — the Adam & Eve of printing types used today. The second great invention, the codex, came at the same time. While the Romans used scrolls made of papyrus, in the fourth century somebody had the idea to cut parchment into oblong pieces and sew them together — thus creating the first random-accessible book. Together with the eminently readable script this must be considered one of the greatest inventions of all time. - Carolingian to Gothic
A beautiful, legible book hand; long ascenders and descenders, letting in light between the lines, open and round letters with few ligatures and variant letterforms. The early Carolingian scripts share some features with the Roman Half-Uncial (the club shape ‘head serifs’ on the ascenders of b, d, h, and l, by the 11th century these were replaced by triangular serifs, similar to those we see in numerous roman typefaces of the incunabula (latter half of the 15th century). The early, rounder a was dropped in favor of one similar to that found in early Roman Uncials. In manuscripts penned in this hand, it is not uncommon to see the r with a descender.
With Charlemagne and the Church behind it, the Carolingian script quickly spread across Europe, deposing a multitude of regional scripts on its way. By the second half of the tenth century, Carolingian script had reached England, replacing late forms of the Insular script; in Spain it replaced Visigothic.
That the open forms of the Carolingian script were replaced, from the 12th century, by the darker, more condensed, angular, ligature-ridden, closed forms of the Gothic scripts is, as Delorez writes, one of the mysteries of history.
- Roman
We stand in the seventeenth century, some 5,000 years after the Sumerians set stylus to clay. We now have a dual alphabet of 26 letters, uppercase and lowercase forms. There is hardly a straight line to be seen in the history of the alphabet. No Darwinian progress there, no survival of the fittest. Many of the aforementioned scripts developed side-by-side, some disappeared and reappeared, some can be shown to be the product of the mind of one man like Alcuin of York. And we do not know what would have happened if Hannibal had marched straight to Rome after winning the battle of Cannae instead of loitering.
Figure 19. A brief History of A (source : google.com)
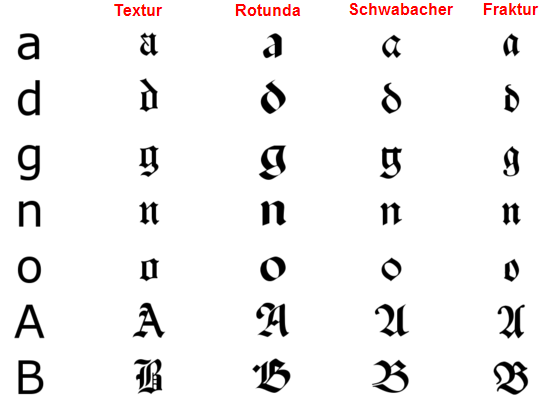
2. Blackletter to Gutenberg's type
Figure 20. From Textur to Fraktur (source : google.com)
They evolved in Western Europe from the mid twelfth century. Over time a wide variety of different blackletters appeared, but four major families can be identified: Textura, Rotunda, Schwabacher and Fraktur. It’s beyond the scope of this article to go into each one, but if you look at the letter “o” in the chart above you will see the difference.
While Gutenberg used blackletters for his bible and books, this signaled a new era in typefaces used for printing. Blackletters are difficult to read as body text and Roman and Italic faces were easier to print with movable type. For these reasons, in the 1500’s, blackletter became less popular for printing in many countries except Germany and the German speaking countries.
Figure 21. Deutsch (source : google.com)
While Gutenberg used blackletters for his bible and books, this signaled a new era in typefaces used for printing. Blackletters are difficult to read as body text and Roman and Italic faces were easier to print with movable type. For these reasons, in the 1500’s, blackletter became less popular for printing in many countries except Germany and the German speaking countries.
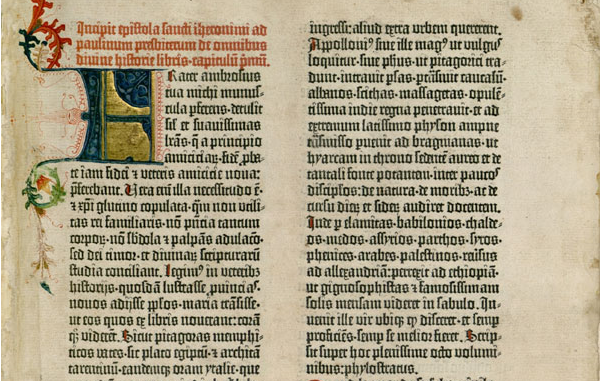
Figure 22. Gutenberg Bible Image (source : google.com)
Germany continued to use Blackletters until the early twentieth century. In the 1920’s it was considered to be antiquated by German designers and publishers and fell out of favor and was replaced by the “New Typography” of sans serif typefaces. In 1933 Hitler declared the new typography to be un-German and declared Fraktur to be “Volk”, i.e. the people’s font. The Nazis continued to use Fraktur extensively until 1941 when it was replace with more readable fonts. Some people associate all blackletters as Nazi fonts but this is clearly an uneducated view and wipes out several hundred years of the typefaces’ history. Check out the Eye Magazine article on the meaning of type for more on this topic. Lecture 5
25 April 2017 (Week 5)
Letters Elements
We were given short theory about letterform, x-height, form-counterform, contrast, and principle of typography. At the end of class, our lectures asked us to fix our blog. Therefore, there is not exercise for this module (next exercise in project 1).
1. Principle of Typography
- Don't use many typefaceDo you know the difference between typeface and font? According to Adobe InDesign’s glossary, ‘A font is a complete set of characters that share a common weight, width, and style’. A typeface is collection of fonts sharing an overall appearance that are designed to be used together. For example, Verdana is a typeface and Verdana 12-pt italic is a font.
Typefaces usually are broken down into the following categories:
- Serif
- Sans-Serif
A serif is a small line attached to the end of a stroke in a letter or a symbol. If the letters and symbols of a typeface have serifs, then we call it a serif typeface. The word “sans” is French for “without” and a Sans-Serif typeface is, as you might have guessed already, a typeface without serifs.The thought is that the strokes of the serif typeface help guide the eye across a line of text. Serifs are almost a standard when it comes to most newspapers. Sans-Serif is said to be easier on the eye when reading online.
Figure 23. Serif and sans serif
- Display
Figure 24. Display
- Script
Figure 25. Script
- Dingbat
2. Contrast is good, but the wrong colors can be painful
The most common form text in is black over white background. Despite the fact that people love colors, sometimes color makes text harder to read, less enjoyable and can ever cause pain when looked at for a longer time. It is almost always a bad idea to choose a text color and a background color which contrast with one another in a discordant manner.
Figure 26. Color scheme
You need to have enough contrast between the background and the text in order for the text to be legible, but you also need to make sure the colors don’t clash. Keeping the background of the text simple (fewer colors) is often the best choice as it allows you to use a small set of colors and get optimal results.
Display typefaces are fun and they look very interesting. No matter how much you like them, don’t use them excessively. Keep in mind that ornamental and display typefaces were not designed to be used for bodies of text as they generally require a larger font to be readable. A good thing to remember is that these faces tend to be more complex, thus tiring the viewer’s eyes easily.
4. Scannable text is must
When writing for the web, readability is not the only thing you have to worry about. The user is free to surf away at any moment and with just one click. Your purpose is to make sure that the text is in such good shape that the reader will keep his interest long enough to read through the whole thing. That won’t happen unless he can easily scan it for focus points that peak his interest.
Focus points are elements that will draw the user’s attention, such as a header, a button, a graphical element, emphasized text.
The main things that impact how scannable your text is are focus points, header size and position, text size, line height, alignment and contrast. Good use of these elements will make sure your reader will be made aware of the content of your copy before choosing to read it wholly or abandon it.
5. Don't Distort typefaces
Each typeface contains styles and weights that are already properly expanded and condensed. Type designers know that people want “thinner” or “thicker” fonts, so sometimes these styles are included in typeface families.
Figure 27. Typefaces
Do not use the bold and italic buttons in character palettes of the software as they are called “false bold/italic”. Instead, use the menu to find the real bold and italic, originally created by the type designer. (https://www.pixel77.com/principles-of-typography/)
2. Form and Counterform
Counterform is the blank spaces between individual letters and as designers this can be used to great effect, also referred to as ‘negative space’. By definition, a word has the potential to express an idea, object, or event. Word signs are independent of the things they represent, yet by design they can be made to signify and reveal their meaning. Such as below. the word ‘Joy’ which is made up of three characters that don’t have any relation to the meaning of the word itself, however in this example they are transformed through using the letters shape and form into a clever way to express the meaning of the word.
Figure 28. Joy
Speaking on the structural consideration of form and counterform and the designing of typefaces, Adrian Frutiger stated:“The material of typography is the black, and it is the designer’s task with the help of this black to capture space, to create harmonious whites inside the letters as well as between them.”
(https://brucewilsongraphics.wordpress.com/2012/10/17/counter-form/)
3. Contrast
As you have probably know, most online readers don’t read line by line, instead they scan (from one point to another). For this reason, designers create typographic contrast and flow by emphasizing certain text. Contrast is important because not all the content within a page have the same value, some have greater significance than the others. By creating contrast, you can direct the reader’s attention to the important messages and at the same time enhance the visual appearance. Here are seven basic methods on how you can create typographic contrast.
- Size
Figure 29. Heading
On the other hand, you can de-emphasize by using smaller font size.
Figure 30. Small Heading
- Typeface / Classification
Figure 31. Serif vs Sans Serif
Generally, to create a contrast between the headings and the body text, we use serif font for the headings and sans-serif font for the body, or vice versa.
Figure 32. An Example
- Color
Figure 33. Navigation to link
You can use faded color to indicate something that is disabled or not available.
Figure 34. Normal and Disabled
Sometime you don’t need to make something bigger to get more attention, you can create emphasis by using brighter color, such as red.
Figure 35. Warning
Instruction
Exercises (20%)
The Brief
Exercises.
Duration of Assignment
4 Weeks (Briefing on Week 1)
DEADLINE
Week 5 (24 Apr 2017)
Description
Throughout the beginning and the middle of the semester, exercises will be prescribed at various
phases of the module. These exercises will aid and benefit you in your quest to gain theoretical
and practical knowledge in Typography that will inform you and provide you with the necessary
experience to take on the module’s projects.
All exercises prescribed are to be completed and documented (labelled, clean, clear & concise) in
your ePortfolio and Hardcopy portfolio respectively.
The exercises are as follows:
1) Calligraphy
2) Lettering
3) Type Expression
Calligraphy: You will choose a calligraphic hand (Round Hand, Black Letter, Uncial). You will
complete the prescribed exercises (vertical lines, horizontal lines, circular lines and letters a–z).
Upon completion of the prescribed exercises, you shall write a small 3 or 4 line passage/poem.
You have 2 weeks for this exercise; it is to be done in class and at home. (2 weeks).
Lettering: Draw out the letters of your name (first name or nick-name). Try to capture your
personality or character in the design of the letters. Using the appropriate software, animate the
drawn out letters while ensuring the animated gif stays withing the character and personality. (1
week).
Type Expression: You will be given 6 words to compose and express. You will be given a set of
typefaces to work with. Through iteration, use the appropriate typeface and compose the letters in
a manner that allows meaning of the word to become visible. (1 week).
Requirements
To complete and to showcase mastery in the exercises prescribed in its various forms over the
13-week period. This process is repeated for all 8 weeks. The work is compiled logically and
chronologically in an A3 clear sheet folder and documented on the students’ eportfolio.
Submission
1. Exercises to be documented in an A4 Clear Sheet folder, logically and chronologically.
The works must be labelled and dated.
2. Eportfolio posts at the end of the assessment task labelled and dated, with images
captured well and in good light in so that the works are pleasing to the eye and legible.
Objectives
1. An appreciation and understanding for the evolution of Typography.
2. An appreciation of the skills sets and mental discipline required in Typography
3. To develop the necessary technical skills and sensibilities for typographic communication.
Exercise
Exercise 1 (28 March 2017) - Basic Calligraphy
Material and tools :1. Graph Paper (A4 size, 2mm square 20cm x 80 cm)
2. Calligraphy pen 2.0 ( Flat nib and diagonal nib)
Step by step :
1. First, prepare three graph papers and two calligraphy pen which are one flat nib and one diagonal nib
2. Next, make vertical line with the flat nib calligraphy pen on the graph paper
3. The second graph paper, make horizontal line with the diagonal nib calligraphy pen
4. The third graph paper, make circular line with the same nib as horizontal line before
Figure 36. Vertical Line
Figure 37. Horizontal Line
Figure 38. Circular Line
Exercise 2 (4 April 2017) - Calligraphy Material and tools :
1. Graph Paper (A4 size, 2mm square 20cm x 80 cm)
2. Calligraphy pen 3.0 (flat nib)
3. A4 Clear Paper (landscape position)
Step by step :
1. First, prepare three graph papers, A4 Paper, and one 3.0 calligraphy pen
2. Next, make write alphabet from A to Z which are lowercase. (Example : from A to H on graph paper and continue in other graph papers)
3. Choose quote which fit 3 lines 4 words in one line.
4. Write down your quote in the middle on A4 paper with landscape position and use 3.0 calligraphy pen flat nib.
 |
| Figure 39. Alphabet Calligraphy |

Figure 40. Calligraphy from A to H

Figure 41. Calligraphy from I to P

Figure 42. Calligraphy Q to Z

Figure 43. Calligraphy quote
Material and Tool :
1. Graph Paper (A4 size, 2mm square 20cm x 80 cm) or any paper that you prefer
2. Pen (you can use any pen that suitable for you)
3. Adobe Illustrator and Adobe Photoshop
Step by step :
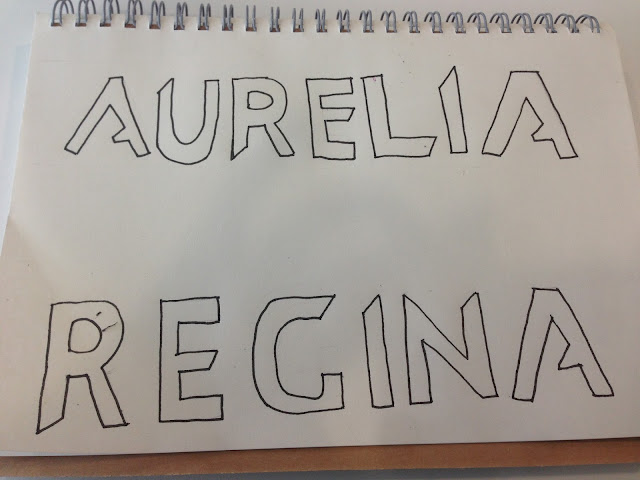
1. Draw your name with graffiti or same as that with out any typography concept
2. Use pen tool in Adobe Illustrator to trace your drawing, color it and save it as PNG
3. Open Adobe Illustrator again
4. Open new documents with 72 dpi, arranged by row ( → ), and use 9 art boards (or you use more than 9, it depends on what you need)
5. Make your GIF as a chronology (example : disappear - appear - disappear) with that artboars
6. Export as PNG and tick "artboard"
7. Open Adobe Photoshop
8. Click File > New
9. Width : 297 , Height : 210 , Resolution 72 pixel/inch and click Ok
10. Click File > Script > Load File into stack > select entire file that you make in Adobe Illustrator
11. Click Windows > Timeline > Create frame animation
12. Add frame as many as you create in Adobe Illustrator and set up all 0.2 second
13. Click first frame > turn off all layer > turn on 1st layer> click 2nd frame > turn of 1st layer > turn on 2nd layer> click 3rd frame > etc.
14. Change "once" into "forever"
15. Export > Save for Web > set up "GIF" > Done
16. You can open your GIF in web.
 |
| Figure 44. Sketch |

Figure 45. Aurelia Regina


Figure 46. Process of trace


Figure 47. Process of making Frame


Figure 48. Process of making GIF

 |
| Figure 49. Static |
Figure 50. Animated GIF

Figure 51. Fail GIF
Exercise 4 (18 April 2017 ) - Type Expression Material and tools :
1. Graph Paper or Drawing book
2. Pen ( you can use any pen that suitable for you)
3. Adobe Illustrator and Adobe Photoshop
Step by step:
1. Sketch "Kick", "jump", "Throw", "Hunt", "Sleep", and "Fart" with only that words
2. Next, put that are words into Adobe Illustrator and use propitiate font to describe that words. (Weight : 297 mm, Height : 210 mm)
3. Pick one words that possible to make animated GIF ( i choose "Sleep")
4. Make that words into animated GIF

Figure 52. Sketch


Figure 53. Type Expression

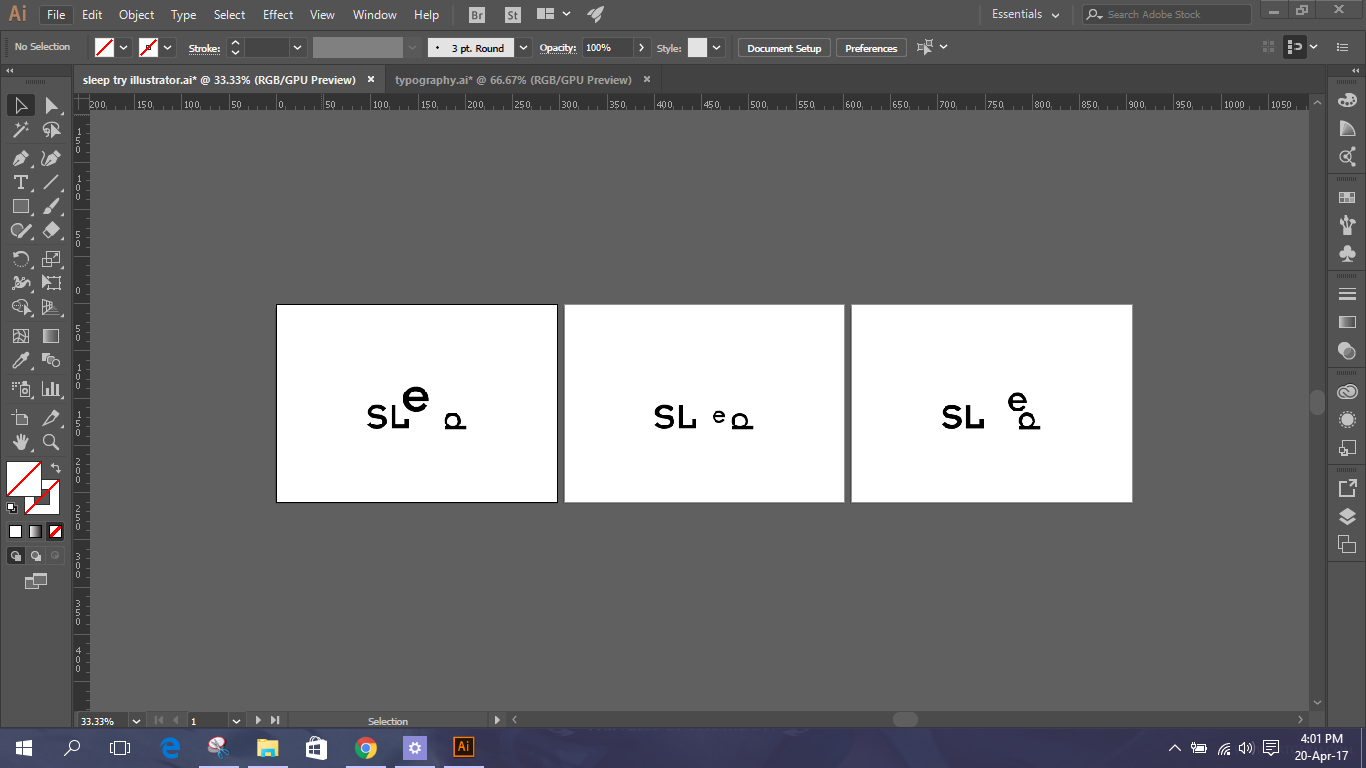
Figure 54. Making Type Expression into GIF (1)


Figure 55. Making Type Expression into GIF(2)


Figure 56. Typography Expression


Figure 57. Sleep GIF (false)


Figure 58. Final and correct gif
Feedback
Week 1
We did research about Western Calligraphy and my group chose "copperlate calligraphy". It is quite good our group perfomance, because we explain about history, then explain what documents that should use this font, and then we gave picture about that fonts.
Week 2
Overall is good. But there are some straight line (horizontal and vertical) and circular line which are inconsistent. Thus, if you (Regina) did some line with not really neat, please leave it and move on to the next line. Therefore, the wrong line that you made will be more "ugly" if you force to stack it.
Week 3
Overall good. The lecture suggest me to practice once again, because based on what i did on the graph paper and A4 paper are good start practice as the beginner. Therefore, i should do with neat. For example, i did quote on sketch book, and for my lecture, this is not pleasing to the eye.
Week 4
There was misunderstood, because Mr Vinod said that "make it better" and i did with full color. So, when he saw my animated GIF, he said that should be no color. And of course, explain why you choose this design. But, i cant explain why because there is deep meaning that i cant explain in sentences.
Week 5
Overall is good, just need make better because too many spacing and bold text. Then, for GIF, a verb that i used is "sleep", but Mr Shamsul read that as "sleed". (So, i remake that GIF to make it better)
Reflection
Experience
I never expected this kind of assignment. Because i don't have any design background and this is my first time to feel how to a be designer life. When a lecture asked us to do this assignment, i felt excited. Therefore, i did all assignment only for four days ( one day with fail result ). I hope with this knowledge, experience, and assignment in the future will lead me to be a great designer
Observation
I noticed that i am kind of person who do everything with mood. For example, if i like the assignment or feel excited with that, i will do that with my best and happy mood. But, if i feel lazy mood or bad mood, i will not do assignment until one day before deadline. And i realized that mood will interrupt my process of work. And another factor, i am kind person who do everything in night, because in the afternoon, i feels like wants to sleep and in the night is my productive atmosphere. Henceforth, i will attempt to do assignment after my lecture ask me and will not do that on one day before deadline. Because i realized a deadline will come everyday without notice are you done with the previous assignment.or not
Findings
Sometimes i found i can do with good time management with good mood. But, in the bad mood or lazy mood, i will do everything randomly and messy and of course it make me hard to do it. Therefore, i need build my mood into good mood with listening music while i do my homework. Hence, listening music which is non-slow music build my mood and i can find new inspiration.
Reference
Typographic Design : Form and Communication (4th Edition)
Figure 59. Typographic Design Book (source : google.com)
I decided to choose this book because this book provides from history of typography to specimen typography. Also, this book explain all in straightforward, brief and a lot of picture to support explanation and understanding. Moreover, i like design layout that this book provide and this is colorful.


Comments
Post a Comment